Make a Toggleable Button With Python
Buttons in Nuke are great, they are fun to press, and look nice in the interface… but Nuke doesn’t have a stock toggleable button, so let’s look at how you can make one!
Step #1 - Getting started
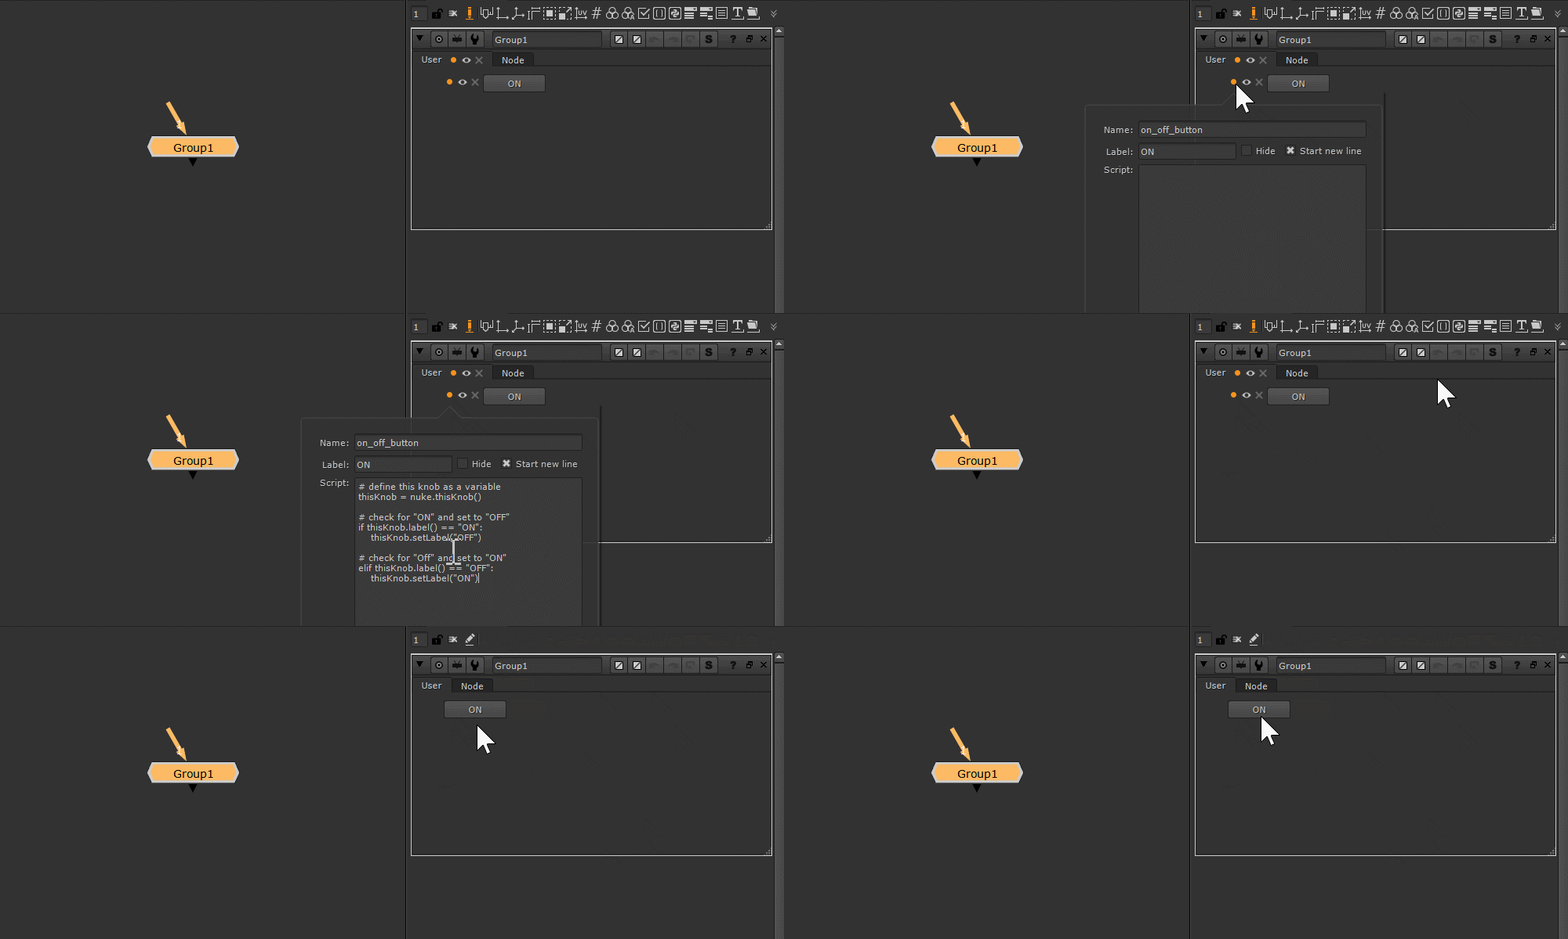
Start by creating an empty group node, and adding a python button to it. We will be placing the button on a group for the purpose of this tutorial, but this method can be used on anything
Step #2 - Creating the button
Give the python button a knob name, and the label “ON”
Step #3 - Changing the button label
In the buttons Script field, we are going to add a small Python script that checks what the current label is, and changes things depending on what it finds. This will be done with an if statement, which you can learn more about here. Let’s start with the basics, and we can add more fun stuff later
First we need to define the python button as a variable that we can use later in the script. We do so by using nuke.thisKnob() which tells python that you are referring to the knob that the script is on
# define this knob as a variable
thisKnob = nuke.thisKnob()
Then we add the first part of the if statement, which checks thisKnob (the button) to see if the label value is currently “ON” and sets it to “OFF” if it is
# check for "ON" and set to "OFF"
if thisKnob.label() == "ON":
    thisKnob.setLabel("OFF")
Now the second part of the if statement, which will check for the opposite, and do the opposite. I am using an elif here for the sake of clarity, but an else would also work
# check for "Off" and set to "ON"
elif thisKnob.label() == "OFF":
    thisKnob.setLabel("ON")
Here is the full script, which will toggle the button label between ON/OFF when pressed. Feel free to copy it into the buttons Script field, or type it out the old fashioned way
# define this knob as a variable
thisKnob = nuke.thisKnob()

# check for "ON" and set to "OFF"
if thisKnob.label() == "ON":
    thisKnob.setLabel("OFF")

# check for "Off" and set to "ON"
elif thisKnob.label() == "OFF":
    thisKnob.setLabel("ON")
This is cool and all, but it doesn’t actually do anything useful yet, so we will look at adding some more functionality in the next step
Step #4 - Changing other knobs
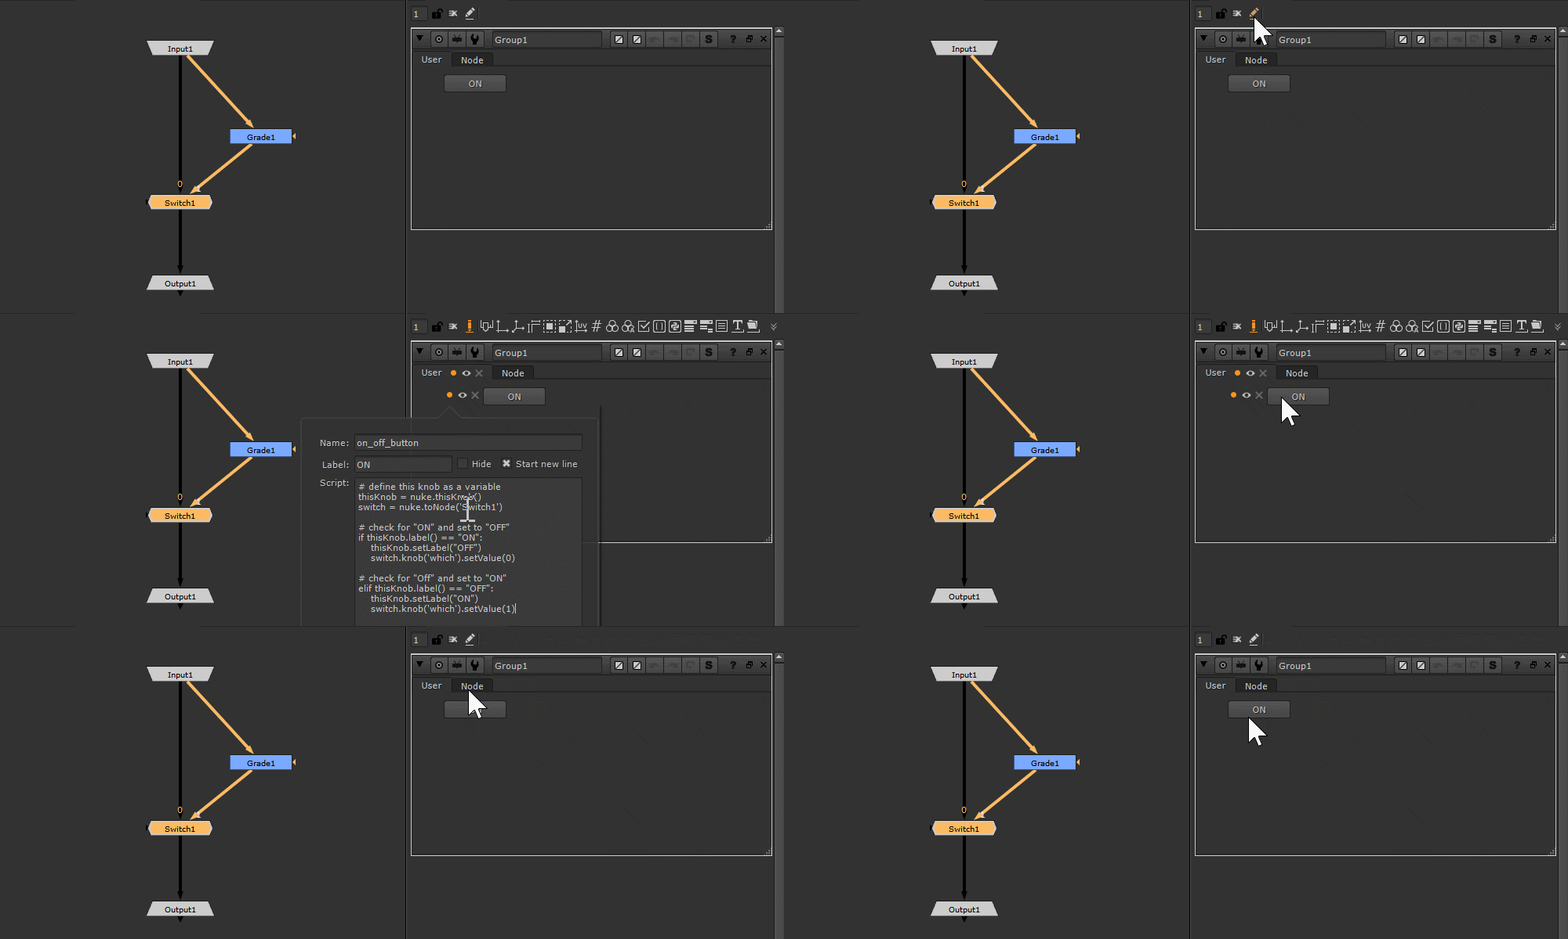
Inside the group node lets make a little node tree with a grade, and a switch node
Now let’s add somethings to our script, to target that switch node, based on the buttons label
To start let’s create a new variable at the top of the script called “switch” and use nuke.toNode(‘Switch1’) to tell python what node we are referring to
# define variables
thisKnob = nuke.thisKnob()
switch = nuke.toNode('Switch1')
Now in the if/elif statements let’s add our switch variable, and use it to target the ‘which’ knob on the switch, and change its value to 0 when the buttons label is being change to OFF, and 1 when the label is being changed to ON
# check for "ON" and set to "OFF"
if thisKnob.label() == "ON":
    thisKnob.setLabel("OFF")
    switch.knob('which').setValue(0)

# check for "Off" and set to "ON"
elif thisKnob.label() == "OFF":
    thisKnob.setLabel("ON")
    switch.knob('which').setValue(1)
Here is the full script
# define variables
thisKnob = nuke.thisKnob()
switch = nuke.toNode('Switch1')

# check for "ON" and set to "OFF"
if thisKnob.label() == "ON":
    thisKnob.setLabel("OFF")
    switch.knob('which').setValue(0)

# check for "Off" and set to "ON"
elif thisKnob.label() == "OFF":
    thisKnob.setLabel("ON")
    switch.knob('which').setValue(1)
And the result
Step #5 - Changing the colors
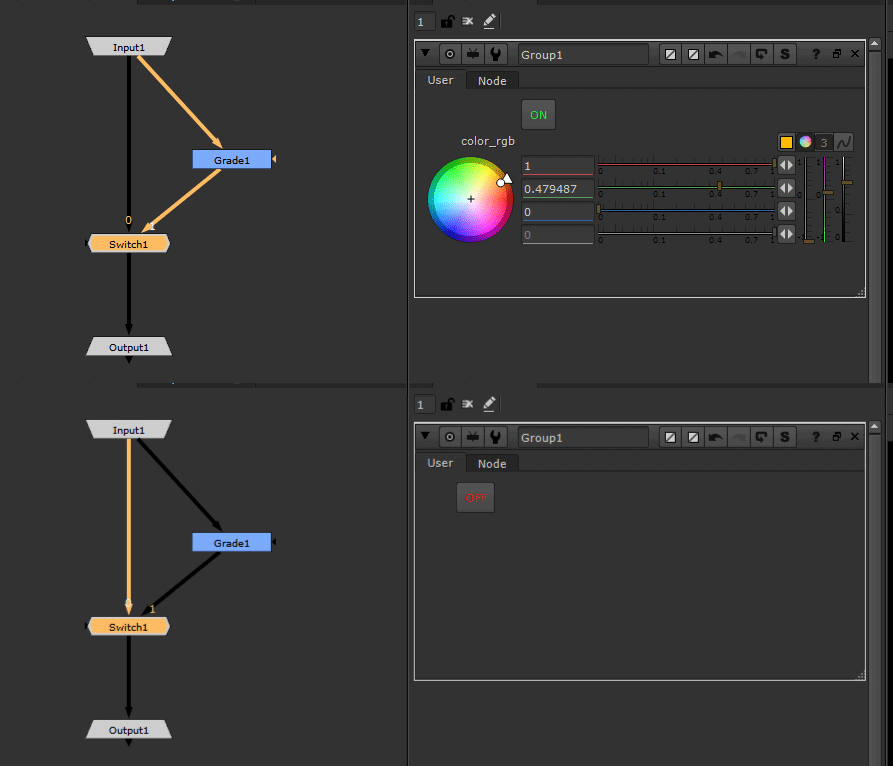
Pretty cool right? In this example we are just changing a single switch node, but you can add much more to the script, and have the button do all sorts of things inside the group. This is great for making tools, but from a usability standpoint I think we can improve it a bit more
Let’s add some colour to go along with the state changes, to help our users know what is going on. We can do this by adding a bit of html to the knob label
In the updated script below I have modified the label values to be written in html. Note that I have put triple quotation marks around the new label, because the html code has its own quotes within it. These will tell python that everything between the triple quotes is part of the same string
You can generate your own html hex colour codes here
# define variables
thisKnob = nuke.thisKnob()
switch = nuke.toNode('Switch1')

# check for "ON" and set to "OFF"
if thisKnob.label() == """<p style="color:#14e330">ON</p>""":
    thisKnob.setLabel("""<p style="color:#e31414">OFF</p>""")
    switch.knob('which').setValue(0)

# check for "Off" and set to "ON"
elif thisKnob.label() == """<p style="color:#e31414">OFF</p>""":
    thisKnob.setLabel("""<p style="color:#14e330">ON</p>""")
    switch.knob('which').setValue(1)
The above script will technically work, but I find it a bit messy to look at, so here is an alternative where I have modified the if statements to check for “ON” and “OFF” within the knob labels string of characters
# define variables
thisKnob = nuke.thisKnob()
switch = nuke.toNode('Switch1')

# check for "ON" and set to "OFF"
if "ON" in thisKnob.label():
    thisKnob.setLabel("""<p style="color:#e31414">OFF</p>""")
    switch.knob('which').setValue(0)

# check for "Off" and set to "ON"
elif "OFF" in thisKnob.label():
    thisKnob.setLabel("""<p style="color:#14e330">ON</p>""")
    switch.knob('which').setValue(1)
Here is the result
Step #6 - Changing the group
Okay, one last trick and we’ll wrap this up. We’ve got the switch changing, and the colors of the button, but how about knobs on the group/tool itself. What if we don’t want the user to interact with something when it is disabled? We can do this with a little bit more python, and in a few different flavours
First lets make a new variable called thisNode to tell python we are referencing the group/tool that the button is on. Then we will use that variable to enable/disable a colour knob on the group itself, using setEnabled()
# define variables
thisKnob = nuke.thisKnob()
thisNode = nuke.thisNode()
switch = nuke.toNode('Switch1')

# check for "ON" and set to "OFF"
if "ON" in thisKnob.label():
    thisKnob.setLabel("""<p style="color:#e31414">OFF</p>""")
    switch.knob('which').setValue(0)
    thisNode.knob('color_rgb').setEnabled(False)

# check for "Off" and set to "ON"
elif "OFF" in thisKnob.label():
    thisKnob.setLabel("""<p style="color:#14e330">ON</p>""")
    switch.knob('which').setValue(1)
    thisNode.knob('color_rgb').setEnabled(True)
You can see the result of this here. The setEnabled() addition to the script will disable the interactivity of the “color_rgb” knob when the button is off
Or if you perfer, you can hide the knob completely using setVisible() instead
# define variables
thisKnob = nuke.thisKnob()
thisNode = nuke.thisNode()
switch = nuke.toNode('Switch1')

# check for "ON" and set to "OFF"
if "ON" in thisKnob.label():
    thisKnob.setLabel("""<p style="color:#e31414">OFF</p>""")
    switch.knob('which').setValue(0)
    thisNode.knob('color_rgb').setVisible(False)

# check for "Off" and set to "ON"
elif "OFF" in thisKnob.label():
    thisKnob.setLabel("""<p style="color:#14e330">ON</p>""")
    switch.knob('which').setValue(1)
    thisNode.knob('color_rgb').setVisible(True)
Just keep in mind that hiding a knobs visibility can change the overall knob layout
And that’s it! Using this technique, and expanding on it with more complex logic, and/or more complex tools, can make all sorts of interesting things happen. Have fun!


